If your car has been acting a little “off” lately, hard starts, poor fuel economy, or random stalling, there’s a good chance the fuel rail pressure sensor is trying to tell you something.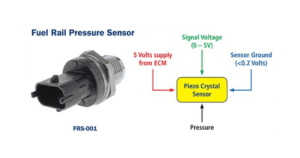 I’ve personally dealt with a failing sensor that caused inconsistent engine performance, and trust me, it’s one of those small parts that can create big headaches. The good news? You don’t need to be a professional mechanic to test it.
In this guide, I’ll walk you through how to test a fuel rail pressure sensor step by step, what tools you need, what results to expect, and how to decide whether to repair or replace it.
What Is a Fuel Rail Pressure Sensor?
The fuel rail pressure sensor measures the fuel pressure inside your engine’s fuel rail and sends that data to the ECU (Engine Control Unit).
Based on this data, your car adjusts fuel injection for optimal performance. When it fails, your engine essentially runs “blind.”
Common Symptoms of a Bad Fuel Rail Pressure Sensor
Before testing, here’s what you might notice:
- Hard starting or no start
- Poor acceleration
- Engine stalling
- Check engine light
- Black smoke from the exhaust
- Reduced fuel efficiency
Tools You’ll Need
From my experience, keeping it simple works best:
- Digital multimeter
- OBD2 scanner
- Fuel pressure gauge (optional but helpful)
- Safety gloves & glasses
Step-by-Step: How To Test a Fuel Rail Pressure Sensor
1. Start With an OBD2 Scan
Plug in your scanner and check for codes like:
- P0190 (Fuel Rail Pressure Sensor Circuit)
- P0191 (Range/Performance problem)
This gives you a quick direction before getting your hands dirty.
2. Visual Inspection
Before testing electronically:
- Check for damaged wires
- Look for corrosion in connectors
- Ensure the sensor is securely mounted
You’d be surprised how often a loose connector is the culprit.
3. Test Voltage with a Multimeter
Most sensors have 3 wires:
- Power (5V reference)
- Ground
- Signal
Steps:
- Turn ignition ON (engine OFF)
- Back-probe the connector
- Measure voltage
Expected Results:
- Power wire: ~5V
- Ground: 0V
- Signal: ~0.5V–1.5V (varies)
If no voltage → wiring or ECU issue.
4. Check Signal Response
Start the engine:
- The signal voltage should increase with throttle
- If it stays flat → faulty sensor
5. Compare With Fuel Pressure Gauge (Advanced Check)
Attach a fuel pressure gauge:
- Compare actual pressure vs sensor reading (via OBD scanner)
- If mismatch → bad sensor
Comparison Table: Testing Methods
| Testing Method | Difficulty | Tools Needed | Accuracy | Best For |
| OBD2 Scan | Easy | Scanner | Medium | Quick diagnosis |
| Visual Inspection | Easy | None | Low | Obvious issues |
| Multimeter Voltage Test | Medium | Multimeter | High | DIY mechanics |
| Fuel Pressure Gauge Test | Hard | Gauge + Scanner | Very High | Advanced troubleshooting |
My Personal Experience
When I first tested a fuel rail pressure sensor, I relied only on an OBD2 scanner. It showed inconsistent readings, but I wasn’t convinced.
Once I used a multimeter, I noticed the signal voltage wasn’t changing at all, a classic sign of a dead sensor. Replacing it instantly fixed rough idling and improved fuel economy.
Lesson learned: Always verify with at least two methods.
Buyer’s Guide: Choosing a Replacement Fuel Rail Pressure Sensor
If your sensor is faulty, here’s how to pick the right one:
1. OEM vs Aftermarket
- OEM: Reliable but expensive
- Aftermarket: Affordable, quality varies
2. Compatibility
Always match:
- Make & model
- Engine type
- Year
3. Brand Reputation
Stick with trusted brands like:
- Bosch
- Denso
- Delphi
4. Warranty
Look for at least a 6–12 month warranty.
Signs You Should Replace (Not Repair)
- No voltage output
- Erratic readings
- Internal short detected
- Persistent error codes after reset
Cost Breakdown
Here’s what you can expect:
- Sensor cost: $50–$200
- Labor: $50–$150
- Total: $100–$350
DIY replacement can save you a lot.
Pro Tips (From Real Experience)
- Always disconnect the battery before unplugging the sensor
- Don’t confuse it with the fuel pressure regulator
- Clean connectors before replacing the sensor
- Double-check wiring continuity
Long Detailed Guide (Expanded Insights)
Why Sensors Fail
Over time, fuel contaminants, heat, and vibration degrade the sensor. In turbocharged engines, higher pressures accelerate wear.
How It Affects Engine Performance
A faulty sensor can cause:
- Incorrect air-fuel mixture
- Engine knocking
- Reduced power output
Testing Without Tools (Basic Check)
If you’re stuck:
- Unplug sensor → engine behavior changes?
- If no change → likely faulty
(Not 100% reliable, but useful in emergencies.)
Read More: What Does The EGR Valve Do
FAQs: How To Test Fuel Rail Pressure Sensor
1. Can I drive with a bad fuel rail pressure sensor?
Yes, but it’s risky. It can damage your engine over time and reduce efficiency.
2. Will a bad sensor throw a code?
Usually, yes, especially codes like P0190–P0193.
3. Can I clean a fuel rail pressure sensor?
Not recommended. It’s a sealed unit cleaning rarely fixes it.
4. How long does it take to test?
- Basic test: 10–15 minutes
- Full diagnostic: 30–60 minutes
5. Is it hard to replace?
Not really. Most cars allow access within 15–30 minutes.
Final Thoughts
Testing a fuel rail pressure sensor isn’t as intimidating as it sounds. With a multimeter, a bit of patience, and the steps above, you can diagnose the issue like a pro.
From my experience, the key is not to jump to a replacement too quickly; a proper test can save you both time and money.


