Checking your vehicle’s engine oil is one of the simplest yet most important maintenance tasks you can perform. Surprisingly, many drivers either skip this essential check or don’t know how to properly read an oil dipstick.
As someone who has owned multiple vehicles over the years, from compact sedans to pickup trucks, I can confidently say that learning how to read a dipstick can save you thousands of dollars in repair costs.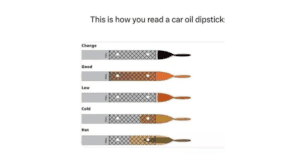 A quick oil check takes less than five minutes, requires no special tools, and can help identify engine problems before they become expensive disasters.
Whether you’re a first-time car owner or simply looking to improve your maintenance knowledge, this guide will walk you through everything you need to know.
Why Checking Engine Oil Matters
Engine oil serves several critical functions:
- Lubricates moving engine parts
- Reduces friction and wear
- Helps cool engine components
- Prevents corrosion
- Removes contaminants and debris
- Improves engine efficiency
When oil levels become too low, engine components can overheat and wear out rapidly. In severe cases, insufficient oil can lead to complete engine failure.
That’s why manufacturers recommend checking oil levels regularly, especially before long trips.
What Is an Oil Dipstick?
An oil dipstick is a long, thin metal rod inserted into the engine’s oil reservoir. It allows drivers to manually check both the oil level and condition. Most dipsticks feature:
- A handle or loop at the top
- A measuring section at the bottom
- Minimum and maximum level indicators
The dipstick acts as a simple measuring tool that instantly tells you whether your engine has enough oil.
Parts of an Oil Dipstick
Understanding the dipstick markings makes reading it much easier.
| Dipstick Part | Purpose | What It Indicates |
| Handle | Pulls dipstick out | Usually brightly colored |
| Shaft | Extends into the oil pan | Transfers the oil level |
| Minimum Mark | Lowest safe oil level | Oil should not fall below this |
| Maximum Mark | Highest safe oil level | Avoid overfilling |
| Crosshatched Area | Safe operating range | Ideal oil level zone |
| Tip | Measures oil level | Displays current oil reading |
Step-by-Step: How To Read a Dipstick for Oil
After years of checking oil on everything from old family cars to modern SUVs, I’ve found that following a simple routine provides the most accurate reading.
Step 1: Park on Level Ground
- Always park your vehicle on a flat surface.
- Uneven ground can cause oil to shift inside the oil pan, resulting in inaccurate readings.
- Turn off the engine and engage the parking brake.
Step 2: Let the Engine Cool
- Wait approximately 5–10 minutes after shutting off the engine.
- This allows oil to drain back into the oil pan.
- Checking immediately after driving may produce a falsely low reading because oil is still circulating through the engine.
Step 3: Locate the Dipstick
Open the hood and look for a brightly colored handle. Common colors include:
- Yellow
- Orange
- Red
Many dipsticks feature an oil can symbol for easy identification. Consult your owner’s manual if you’re unsure.
Step 4: Remove the Dipstick
- Pull the dipstick out slowly.
- You’ll notice oil coating the measuring end.
- At this stage, ignore the reading because oil may have splashed onto the stick while the engine was running.
Step 5: Wipe It Clean
Use:
- A clean rag
- Paper towel
- Lint-free cloth
Remove all oil from the measuring section. This step ensures an accurate reading.
Step 6: Reinsert the Dipstick Fully
- Push the dipstick all the way back into its tube.
- Ensure it’s completely seated.
- Partial insertion can result in false readings.
Step 7: Pull It Out Again
- Remove the dipstick carefully.
- Now examine the oil level at the bottom measuring area.
- This second reading is the accurate one.
Understanding Dipstick Markings
Manufacturers use different marking systems.
Holes
Some dipsticks use two holes:
- Lower hole = minimum
- Upper hole = maximum
Oil should be between them.
Lines
Other dipsticks use etched lines.
The lower line indicates the minimum oil level.
The upper line indicates the maximum oil level.
Crosshatched Area
Many modern dipsticks feature a textured zone.
Oil should fall somewhere within this section.
The closer to the upper mark, the better.
Oil Level Reading Guide
| Reading Position | Meaning | Action Needed |
| Above Maximum | Overfilled | Remove excess oil |
| At Maximum | Ideal | No action required |
| Mid-Range | Safe | Continue monitoring |
| Near Minimum | Low | Add oil soon |
| Below Minimum | Dangerous | Add oil immediately |
What the Oil Color Means
Checking the oil level is only half the job.
Oil condition also reveals engine health.
Amber or Golden
Fresh, healthy oil.
No concerns.
Dark Brown
Normal for oil that’s been in service.
Continue monitoring.
Black
May indicate old oil.
Consider changing it soon.
Milky or Creamy
Potential coolant contamination.
This could signal a head gasket issue.
Seek professional inspection immediately.
Metallic Particles
A warning sign of internal engine wear.
Professional diagnosis is recommended.
Common Mistakes People Make
Over the years, I’ve seen many drivers make the same oil-checking errors.
Checking on a Slope
Oil shifts to one side of the pan.
Results become inaccurate.
Not Wiping the Dipstick
The first reading is almost always misleading.
Always wipe and reinsert.
Adding Too Much Oil
Many people assume more oil is better.
It isn’t.
Excess oil can:
- Increase crankshaft drag
- Cause foaming
- Damage seals
- Reduce performance
Using the Wrong Oil
Always follow manufacturer specifications.
Viscosity matters.
For example:
- 0W-20
- 5W-30
- 10W-40
Using the wrong oil can affect lubrication and fuel economy.
My Personal Experience with Oil Checks
I learned the importance of checking oil the hard way. Years ago, I owned an older sedan that seemed perfectly healthy. Because there were no dashboard warning lights, I assumed everything was fine.
One day, while preparing for a road trip, I decided to check the dipstick. The oil level was barely touching the minimum mark. Had I ignored it, I likely would have driven hundreds of miles with dangerously low lubrication. Since then, checking oil has become part of my monthly maintenance routine.
What surprised me most is how many modern vehicles still consume small amounts of oil between changes. Even newer engines aren’t immune. A two-minute dipstick check has saved me countless headaches over the years.
How Often Should You Check Oil?
| Vehicle Condition | Recommended Frequency |
| New Vehicle | Once per month |
| High-Mileage Vehicle | Every 2 weeks |
| Long Road Trips | Before every trip |
| Towing Vehicles | Weekly |
| Older Engines | Weekly |
| Performance Cars | Every fuel fill-up or weekly |
Regular checks help detect leaks and oil consumption early.
Signs Your Vehicle May Be Low on Oil
Watch for these symptoms:
- Oil pressure warning light
- Engine knocking sounds
- Increased engine noise
- Burning oil smell
- Reduced performance
- Excessive exhaust smoke
- Poor fuel economy
If any of these appear, check the dipstick immediately.
Comparison Table: Reading Different Dipstick Styles
| Dipstick Style | Ease of Reading | Accuracy | Common Vehicles | Best For |
| Two-Hole Design | Excellent | High | Older vehicles | Beginners |
| Line Marking Design | Good | High | Most modern cars | Everyday use |
| Crosshatched Design | Excellent | Very High | Modern vehicles | Precise monitoring |
| Electronic Oil Monitor | Very Easy | High | Luxury vehicles | Convenience |
| Digital Dashboard System | Very Easy | Moderate-High | New vehicles | Quick checks |
Buyer’s Guide: Tools for Easy Oil Checking
While reading a dipstick requires almost no equipment, a few inexpensive items make the process cleaner and easier.
Microfiber Towels
Ideal for wiping dipsticks without leaving lint. Benefits:
- Reusable
- Absorbent
- Durable
LED Flashlight
Helpful for reading oil levels in poor lighting. Look for:
- Compact size
- Bright output
- Water resistance
Oil Funnel
Useful when adding oil.
Prevents spills and messes.
Disposable Gloves
Protect hands from dirty oil.
Especially useful during winter maintenance.
Oil Catch Container
Helpful if you accidentally overfill and need to remove excess oil.
When to Add Oil
Add oil when:
- The level reaches the minimum mark
- The vehicle consumes oil regularly
- The manufacturer recommends topping off
Add small amounts at a time. Wait a few minutes and recheck the dipstick after each addition. This prevents overfilling.
When to Change Oil Instead of Adding More
Adding oil is not a substitute for an oil change. Replace oil when:
- Service interval is reached
- Oil becomes excessively dark
- Engine performance declines
- Oil smells burnt
- Manufacturer’s schedule recommends replacement
Regular oil changes remove contaminants and restore lubrication performance.
Can You Check Oil While the Engine Is Hot?
Technically, yes, but accuracy varies. For the best reading:
- Drive normally.
- Park on level ground.
- Turn the engine off.
- Wait 5–10 minutes.
- Check oil.
This method provides the most reliable measurement.
Read More: How Long Rear Facing Car Seat
FAQs: How To Read A Dipstick For Oil
How do I know if my oil level is low?
If the oil is at or below the minimum mark on the dipstick, your engine needs additional oil.
Should oil be checked hot or cold?
Most manufacturers recommend checking after the engine has been off for 5–10 minutes.
What happens if oil is overfilled?
Overfilling can cause foaming, seal damage, reduced performance, and engine stress.
Can I drive with oil below the minimum mark?
It’s not recommended. Add oil as soon as possible to avoid engine damage.
Why is my oil black?
Dark oil is normal over time as it collects contaminants. Extremely dirty oil may indicate it’s time for a change.
How much oil should be between the minimum and maximum marks?
Typically, the difference represents about one quart (roughly one liter), though this varies by vehicle.
Can I trust electronic oil monitors?
They are useful but should not completely replace manual dipstick checks whenever a dipstick is available.
How often should beginners check engine oil?
Once per month is a good starting point, with additional checks before long trips.
What if there is no oil on the dipstick?
The oil level may be dangerously low. Add oil immediately and inspect for leaks or excessive consumption.
Can dirty oil affect the dipstick reading?
Dirty oil won’t usually affect level accuracy, but it can indicate maintenance is overdue.
Final Thoughts
Learning how to read a dipstick for oil is one of the most valuable maintenance skills any driver can develop. It requires no mechanical expertise, takes only a few minutes, and can dramatically extend engine life.
From personal experience, regularly checking oil provides peace of mind and often reveals issues long before warning lights appear. Whether you drive a brand-new vehicle or a high-mileage workhorse, a quick monthly dipstick inspection can prevent expensive repairs and keep your engine running smoothly for years.
The key points are simple: park on level ground, wipe the dipstick clean, reinsert it fully, and verify that the oil sits between the minimum and maximum marks.
Once you master these steps, you’ll have greater confidence in maintaining your vehicle and protecting one of its most important components.

