A properly functioning air conditioning system can make every drive more comfortable, especially during hot summer months. However, when your car’s AC starts blowing warm air, produces strange odors, or struggles to cool the cabin, the evaporator may be the culprit.
The evaporator is one of the most important components of a vehicle’s air conditioning system. Unfortunately, it’s also one of the most difficult parts to access and diagnose because it’s usually hidden behind the dashboard.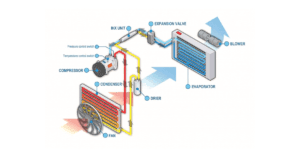 After dealing with AC problems in several vehicles over the years, I’ve learned that testing an evaporator correctly can save hundreds of dollars in unnecessary repairs. Many people immediately replace compressors, condensers, or refrigerant only to discover the evaporator was causing the issue all along.
This comprehensive guide explains how to test a car AC evaporator, identify common symptoms, use the right diagnostic tools, and determine whether repair or replacement is necessary.
What Is a Car AC Evaporator?
The evaporator is a heat exchanger located inside the HVAC housing behind the dashboard.
Its primary job is to absorb heat from the cabin air. As refrigerant passes through the evaporator core, it changes from a liquid to a gas, creating cold air that is blown into the vehicle interior.
Main Functions
- Cool cabin air
- Removes humidity from the air
- Helps maintain passenger comfort
- Works with the compressor and condenser to complete the AC cycle
When the evaporator becomes damaged or develops leaks, cooling performance drops significantly.
Common Signs of a Bad AC Evaporator
Before testing, it’s important to recognize the symptoms.
| Symptom | Possible Cause | Severity |
| Weak cooling | Refrigerant leak in the evaporator | Moderate |
| Warm air from vents | Evaporator failure | High |
| Musty smell | Mold buildup on the evaporator | Low to Moderate |
| Refrigerant loss | Evaporator leak | High |
| AC cycles frequently | Pressure imbalance | Moderate |
| Dashboard moisture | Condensation issues | Moderate |
| Hissing sound behind dashboard | Refrigerant escaping | High |
These symptoms often indicate the need for further testing.
How the Evaporator Works
Understanding the evaporator makes diagnosis easier.
AC Cycle Overview
- The compressor compresses refrigerant.
- A condenser removes heat.
- The expansion valve lowers pressure.
- The evaporator absorbs cabin heat.
- Refrigerant returns to the compressor.
When the evaporator develops leaks or restrictions, the entire cycle becomes inefficient.
Tools Needed to Test a Car AC Evaporator
A few basic tools can help identify problems.
| Tool | Purpose | Difficulty Level |
| UV Leak Detection Kit | Finds refrigerant leaks | Easy |
| AC Manifold Gauge Set | Measures system pressure | Intermediate |
| Electronic Leak Detector | Detects refrigerant gas | Easy |
| Thermometer | Measures vent temperatures | Easy |
| Inspection Camera | Views hidden components | Intermediate |
| Vacuum Pump | Confirms system integrity | Advanced |
Having at least a UV kit and gauge set can make diagnosis much easier.
Step-by-Step: How To Test Car AC Evaporator
Step 1: Check AC Performance
Start by evaluating cooling performance.
Procedure
- Start the engine.
- Turn the AC to maximum cooling.
- Set the blower to the highest speed.
- Close all windows.
- Measure vent temperature.
Normal Results
- Vent temperature should generally be 35°F–55°F (2°C–13°C), depending on ambient temperature.
If temperatures are significantly higher, additional testing is required.
Step 2: Inspect for Refrigerant Leaks
Evaporator leaks are among the most common failures.
Signs of Refrigerant Leakage
- AC cooling decreases over time
- Refrigerant requires frequent recharging
- Oily residue near the drain tube
- Hissing sounds behind the dashboard
A leak is often the first indication of evaporator damage.
Step 3: Use a UV Dye Test
This is one of the most reliable DIY methods.
How It Works
Special UV dye circulates with refrigerant. If a leak exists:
- Dye escapes with refrigerant
- UV light reveals bright fluorescent residue
Procedure
- Add UV dye to the system.
- Operate the AC for several days.
- Inspect the evaporator drain tube.
- Shine UV light around the drain opening.
Positive Result
Bright green or yellow dye indicates an evaporator leak.
Step 4: Check the Evaporator Drain Tube
Many technicians diagnose evaporator leaks through the drain tube.
Location
Usually underneath the passenger side of the vehicle.
Inspection
Look for:
- Oily residue
- UV dye traces
- Excess moisture
- Dirt accumulation
Any refrigerant oil exiting through the drain often points toward evaporator leakage.
Step 5: Use an Electronic Leak Detector
Electronic sniffers are highly effective.
Procedure
- Run the AC system.
- Insert detector probe near vents.
- Check the evaporator drain area.
- Listen for detector alerts.
What It Detects
Escaping refrigerant molecules from the evaporator core. Professional technicians frequently rely on this method because it doesn’t require major disassembly.
Step 6: Measure AC System Pressure
Pressure readings can reveal evaporator issues.
Connect Manifold Gauges
Attach gauges to:
- Low-pressure port
- High-pressure port
Compare Readings
Abnormal pressure patterns may indicate:
- Evaporator restriction
- Expansion valve failure
- Refrigerant leaks
Low pressures on both sides often suggest refrigerant loss.
Step 7: Inspect Airflow
A restricted evaporator affects airflow.
Symptoms
- Weak airflow
- Frozen evaporator core
- Uneven vent temperatures
Check:
- Cabin air filter
- Blower motor
- Air ducts
Sometimes airflow issues mimic evaporator failure.
Step 8: Check for Evaporator Freezing
A freezing evaporator cannot cool efficiently.
Signs
- Ice on refrigerant lines
- Airflow decreases over time
- Cooling returns after the AC is off
Possible causes include:
- Low refrigerant
- Faulty expansion valve
- Dirty evaporator core
Personal Experience Testing an AC Evaporator
Several years ago, my sedan’s AC began blowing warm air every few weeks. I repeatedly added refrigerant, assuming the leak was minor. After performing a UV dye test, I discovered fluorescent dye dripping from the evaporator drain tube.
The evaporator core had developed a tiny pinhole leak hidden behind the dashboard. Without testing, I would have continued replacing refrigerant and wasting money.
The diagnostic process confirmed the real problem before I paid for the repair. This experience reinforced the importance of proper evaporator testing.
Most Common Evaporator Problems
1. Refrigerant Leaks
The most common issue. Causes include:
- Corrosion
- Manufacturing defects
- Vibration damage
- Age-related wear
2. Mold and Mildew Buildup
Moisture accumulates on evaporator fins. This can cause:
- Musty odors
- Reduced airflow
- Allergic reactions
3. Clogged Evaporator Core
Dust and debris reduce efficiency. Symptoms include:
- Weak airflow
- Poor cooling
- Increased compressor load
4. Internal Corrosion
Moisture and contaminants gradually damage aluminum components. Corrosion often leads to refrigerant leaks.
DIY Testing vs Professional Diagnosis
| Testing Method | DIY Friendly | Accuracy | Cost |
| Visual Inspection | Yes | Moderate | Low |
| UV Dye Test | Yes | High | Low |
| Electronic Leak Detector | Yes | Very High | Medium |
| Pressure Testing | Intermediate | High | Medium |
| Nitrogen Pressure Test | No | Very High | High |
| Smoke Testing | Professional | Excellent | High |
For most vehicle owners, UV dye testing provides the best balance of cost and accuracy.
When the Evaporator Needs Replacement
Testing may reveal damage beyond repair. Replacement is usually necessary when:
- Leak is confirmed
- The core is corroded
- Fins are severely damaged
- Refrigerant loss continues
Because the evaporator sits behind the dashboard, labor costs are often high.
Evaporator Replacement Cost
Typical costs include:
| Vehicle Type | Estimated Cost |
| Compact Car | $600–$1,200 |
| Sedan | $800–$1,500 |
| SUV | $1,000–$2,000 |
| Luxury Vehicle | $1,500–$3,500+ |
Most of the expense comes from labor rather than the evaporator itself.
Buyer’s Guide: Choosing AC Diagnostic Tools
If you plan to test your own AC system, investing in quality diagnostic tools can save money over time.
What to Look For
Accuracy
Choose tools with proven reliability.
Ease of Use
Beginners should prioritize simple operation.
Compatibility
Ensure tools work with modern refrigerants.
Durability
Professional-grade tools last longer and provide better readings.
Best Tool Categories
UV Leak Detection Kits
Ideal for locating evaporator leaks. Best for:
- DIY users
- Occasional diagnostics
Electronic Leak Detectors
Offer fast and accurate leak detection. Best for:
- Frequent AC work
- Advanced DIY mechanics
Manifold Gauge Sets
Essential for pressure testing. Best for:
- Intermediate users
- Full AC diagnostics
Inspection Cameras
Useful for hidden evaporator areas. Best for:
- Hard-to-reach components
- Detailed inspections
Preventing Future Evaporator Problems
Regular maintenance helps extend evaporator life.
Recommended Practices
- Replace the cabin air filter regularly
- Run AC throughout the year
- Keep the evaporator drain clear
- Address refrigerant leaks immediately
- Clean the HVAC system periodically
Preventive maintenance is often cheaper than major repairs.
Expert Tips for Accurate Testing
Always Start With Symptoms
Don’t assume the evaporator is the problem.
Verify Refrigerant Level
Low refrigerant can mimic evaporator failure.
Check the Cabin Filter
Restricted airflow may produce similar symptoms.
Use Multiple Tests
Combining UV dye and electronic detection improves accuracy.
Avoid Guesswork
Testing saves money and prevents unnecessary parts replacement.
Read More: How Much Is A Coil Pack For A Car
FAQs: How To Test Car AC Evaporator
How do I know if my car AC evaporator is bad?
Common signs include weak cooling, refrigerant loss, musty odors, dashboard hissing sounds, and warm air from vents.
Can an evaporator leak be repaired?
Minor leaks are sometimes repaired, but most evaporators require replacement for a permanent fix.
What is the easiest way to test an evaporator?
A UV dye leak detection test is usually the easiest and most affordable method.
Can I drive with a leaking evaporator?
Yes, but AC performance will continue to decline, and refrigerant loss may eventually damage other AC components.
Why does my evaporator freeze up?
Low refrigerant, restricted airflow, dirty coils, or expansion valve issues commonly cause freezing.
How much does an evaporator replacement cost?
Most repairs range from $600 to $2,000 or more, depending on vehicle make and labor requirements.
Can a clogged cabin filter mimic evaporator problems?
Yes. A dirty cabin filter can reduce airflow and create symptoms similar to evaporator failure.
How long does an AC evaporator last?
Most evaporators last 8–15 years, though climate, maintenance, and usage patterns affect lifespan.
Is an electronic leak detector better than UV dye?
Electronic detectors are often more sensitive, but UV dye provides visual confirmation of leak locations.
Should I replace the expansion valve when replacing the evaporator?
Many technicians recommend replacing the expansion valve at the same time because labor overlap makes future repairs easier and more cost-effective.
Final Verdict
Testing a car AC evaporator may seem intimidating because the component is hidden deep inside the dashboard, but several effective diagnostic methods make the process manageable.
UV dye testing, electronic leak detectors, pressure readings, and drain tube inspections can accurately identify evaporator problems without removing major interior components.
In my experience, the UV dye method offers the best combination of affordability and reliability for most vehicle owners. If testing confirms a leak, replacing the evaporator is often the only permanent solution.
Although replacement can be expensive due to labor costs, identifying the issue early prevents ongoing refrigerant loss and restores proper cooling performance. A careful diagnosis today can save significant repair costs tomorrow.


