Let me be honest, there’s nothing quite as annoying as walking up to your car and seeing a cracked or completely shattered wing mirror glass. It happened to me on a busy morning, probably from a tight parking squeeze or a careless motorbike brushing past.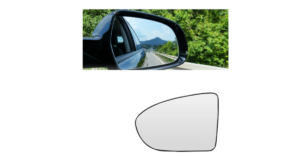 At first, I thought I’d need to replace the entire mirror assembly (and spend a lot), but I quickly learned that replacing just the mirror glass is not only possible, but it’s also often the smartest move.
In this guide, I’ll walk you through my real experience with wing mirror glass replacement, what it costs, how easy (or tricky) it is, and what you should watch out for. If you’re considering fixing yours, this will save you time, money, and frustration.
My First Reaction: Panic (and a Bit of Overthinking)
When I first saw the damage, I assumed:
- The entire side mirror had to go
- It would cost a fortune
- I’d need a mechanic
Turns out, none of that was entirely true. After some quick research, I discovered:
- The glass is often a separate component
- Replacement glass is widely available
- DIY is very doable
That realization alone saved me a significant amount of money.
What Is Wing Mirror Glass?
Wing mirror glass is the reflective part of your side mirror that allows you to see vehicles behind and beside you. It may include:
- Standard flat glass
- Convex glass (wider field of view)
- Heated glass (defrosting feature)
- Auto-dimming variants
The key takeaway? The glass is usually detachable from the housing.
Replacement Options: What I Considered
Before replacing mine, I looked at a few options:
- DIY Glass Replacement
- Professional Repair
- Full Mirror Assembly Replacement
Here’s how they compare:
Comparison Table: Wing Mirror Repair Options
| Option | Cost Range | Difficulty Level | Time Required | Best For |
| DIY Glass Replacement | $10 – $50 | Easy–Moderate | 10–30 mins | Budget-conscious car owners |
| Professional Replacement | $50 – $150 | None | 30–60 mins | Convenience seekers |
| Full Mirror Replacement | $100 – $400+ | Moderate–Hard | 1–2 hours | Severe damage cases |
My Actual Experience (Step-by-Step)
I went with the DIY route, and honestly, it was easier than expected.
Step 1: Buying the Right Glass
This part is critical. I had to match:
- Car make and model
- Mirror type (heated or not)
- Shape and size
Tip: Always double-check compatibility before buying.
Step 2: Removing the Broken Glass
This was the most nerve-wracking part.
- I wore gloves (highly recommended)
- Carefully removed loose shards
- Used gentle pressure to detach remaining pieces
Some mirrors clip in, others use adhesive backing.
Step 3: Cleaning the Surface
I cleaned the backing plate thoroughly:
- Removed old adhesive
- Wiped away dust and debris
A clean surface ensures proper fitting.
Step 4: Installing the New Glass
My replacement glass had adhesive backing, so:
- Peeled off the protective layer
- Carefully aligned the glass
- Pressed firmly into place
If your mirror is heated, you’ll also need to reconnect the wiring.
Step 5: Testing
After installation:
- Checked alignment
- Adjusted mirror angle
- Tested heating function (if applicable)
Everything worked perfectly.
What Surprised Me the Most
A few things really stood out:
- It took less than 20 minutes
- The cost was under $30
- It looked completely factory-fitted
- No special tools required
Honestly, I wish I had known this earlier.
Pros and Cons (From My Experience)
Pros
- Extremely cost-effective
- Quick fix
- DIY-friendly
- Widely available parts
Cons
- Risk of buying the wrong size
- Slight learning curve
- Fragile during installation
Buyer’s Guide: Choosing the Right Wing Mirror Glass
If you’re planning to replace your mirror glass, here’s what you need to consider:
1. Compatibility
Always match:
- Make, model, and year
- Left or right side
- Heated vs non-heated
Mistakes here can waste time and money.
2. Glass Type
Choose based on your needs:
- Flat Glass: Accurate reflection
- Convex Glass: Wider field, slightly distorted
- Aspherical Glass: Combines both
3. Heated Function
If your car has heated mirrors:
- Make sure the replacement supports it
- Check for connector compatibility
4. Adhesive vs Clip-On
- Adhesive-backed: Easier to install
- Clip-on: More secure, OEM-style
5. Build Quality
Look for:
- Clear reflection
- Durable backing
- Good reviews
Cheap glass can distort your view don’t compromise on safety.
6. Price vs Value
From my experience:
- Cheap doesn’t always mean bad
- But extremely cheap = questionable quality
Aim for mid-range options with solid reviews.
Common Mistakes to Avoid
I almost made a few of these myself:
- Buying the wrong side (left vs right)
- Ignoring the heated feature compatibility
- Not cleaning the backing properly
- Applying glass unevenly
Take your time, it’s worth it.
When You Should Replace the Entire Mirror
Sometimes, replacing just the glass isn’t enough. Consider full replacement if:
- Mirror housing is broken
- Motor adjustment isn’t working
- Wiring is damaged
In those cases, a complete unit makes more sense.
Long-Term Durability (My Follow-Up Experience)
After several months:
- The mirror is still firmly attached
- No vibration or looseness
- Heating works fine
- No distortion
In short, it holds up just like the original.
Is DIY Worth It?
In my honest opinion: absolutely yes. If you’re comfortable with basic hands-on work:
- It saves money
- It’s quick
- It’s satisfying
But if you’re unsure, a professional can still do it cheaply.
Read More: Car Window Seal Replacement | My Honest Experience
FAQs: Wing Mirror Glass Replacement | My Honest Experience
1. Can I drive with a broken wing mirror glass?
Technically, yes, but it’s unsafe and often illegal. It reduces visibility and increases accident risk.
2. How much does wing mirror glass replacement cost?
DIY: $10–$50
Professional: $50–$150
3. Is it hard to replace the mirror glass yourself?
Not really. Most people can do it in under 30 minutes with minimal tools.
4. Do I need glue for mirror glass?
Some come with adhesive backing. Others may require automotive adhesive.
5. What if my mirror is heated?
You’ll need compatible glass and reconnect the wiring during installation.
6. How do I know if my mirror is convex or flat?
Convex mirrors usually have a slight curve and may include a “objects are closer than they appear” warning.
7. Can I replace just the glass instead of the whole mirror?
Yes, in most cases. That’s the cheapest and easiest option.
8. How long does replacement take?
Typically 10–30 minutes.
9. Will the new glass match perfectly?
If you buy the correct model-specific part, yes.
10. Is professional installation worth it?
If you’re not confident, yes, but it’s not strictly necessary.
Final Thoughts
Wing mirror glass replacement is one of those repairs that seems intimidating but really isn’t. My experience taught me:
- Don’t rush to replace the entire mirror
- DIY is easier than expected
- A small fix can make a big difference
If your mirror glass is cracked or broken, don’t ignore it. It’s a safety issue and luckily, an easy one to fix.


