If you’ve ever opened your car’s hood and stared at the engine, wondering what that thin metal rod is for, you’re not alone. The oil dipstick is one of the simplest yet most important tools under the hood.
In just a minute or two, it can tell you whether your engine has enough oil, whether the oil is still in good condition, or whether it’s time to top it up or schedule an oil change.
Many drivers skip this quick inspection because they assume it’s difficult or that modern cars will warn them if something is wrong. While warning lights are helpful, they often appear only after a problem has already developed.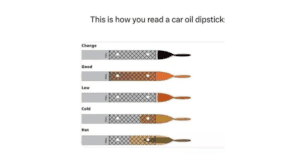 Learning how to read the dipstick gives you the chance to catch issues early and prevent expensive engine repairs. I’ve made checking the dipstick part of my monthly maintenance routine, and it has saved me from unnecessary worry more than once.
On one occasion, I noticed the oil level had dropped just below the recommended mark before a long road trip. Adding a little oil took only a few minutes and gave me confidence that the engine was properly protected for the journey ahead.
The best part is that reading a dipstick doesn’t require any mechanical experience. Whether you’re a first-time driver or someone who’s owned cars for years, this guide will walk you through everything you need to know in clear, simple language.
In this comprehensive guide, you’ll learn:
- What an oil dipstick does
- How to read the dipstick correctly
- What the markings mean
- How to tell if your oil is dirty
- Common mistakes to avoid
- When to add oil
- Tips for keeping your engine healthy
- Answers to the most frequently asked questions
Let’s begin with the basics.
What Is an Engine Oil Dipstick?
An engine oil dipstick is a long, thin metal rod designed to measure the amount of engine oil inside your vehicle. It slides into a narrow tube that reaches down into the oil pan, allowing you to check both the oil level and its condition.
Most dipsticks have a brightly colored handle, usually yellow, orange, or red, making them easy to find in the engine bay.
At the bottom of the dipstick, you’ll find measurement markings that indicate the acceptable oil range. Depending on the manufacturer, these may include:
- MIN and MAX
- LOW and FULL
- Two small holes
- Crosshatched areas
- Lines or notches
The oil should fall somewhere between the minimum and maximum marks.
Why Reading the Dipstick Is So Important
Engine oil performs several critical jobs:
- Lubricates moving engine parts
- Reduces friction
- Removes heat
- Prevents corrosion
- Cleans contaminants
- Protects against premature wear
If the oil level becomes too low, these functions are compromised. Even driving a short distance with insufficient oil can increase engine wear.
Checking the dipstick regularly helps you:
- Detect low oil before damage occurs
- Spot oil leaks early
- Monitor oil consumption
- Extend engine life
- Improve reliability
- Avoid costly repairs
Spending two minutes checking your oil once a month can save thousands of dollars in repair bills over the life of your vehicle.
When Should You Check Your Oil?
Timing matters if you want an accurate reading. For the best results:
- Park on a level surface.
- Turn the engine off.
- Wait 5–10 minutes so the oil drains back into the oil pan.
- Open the hood.
- Locate the dipstick.
Some manufacturers recommend checking the oil when the engine is completely cold, while others suggest checking it shortly after warming up. Your owner’s manual provides the best guidance for your specific vehicle.
Tools You’ll Need
Fortunately, checking the oil requires very little equipment. You’ll need:
- A clean paper towel or lint-free cloth
- Protective gloves (optional)
- Flashlight (helpful in low light)
- Correct engine oil (if topping off)
That’s it.
Step-by-Step: How To Read The Dipstick
Step 1: Park Safely
Choose flat, level ground.
If the vehicle is parked on a hill, the oil inside the pan shifts to one side, giving an inaccurate reading.
Turn off the engine and engage the parking brake.
Step 2: Wait a Few Minutes
After shutting off the engine, wait around five to ten minutes.
This allows the oil circulating through the engine to drain back into the oil pan, ensuring the dipstick reflects the true oil level.
Checking immediately after switching off the engine may show a lower reading than the actual level.
Step 3: Locate the Dipstick
Open the hood.
Look for a brightly colored loop or T-shaped handle labeled “Engine Oil” if markings are present.
If you’re unsure, consult your owner’s manual.
Step 4: Remove the Dipstick
Pull the dipstick straight out.
You’ll likely notice oil coating the lower end.
Don’t worry about reading it yet.
Step 5: Wipe It Clean
Using a clean cloth or paper towel, wipe all the oil from the measuring end.
This first wipe removes splashed oil that could otherwise give a false reading.
Step 6: Reinsert the Dipstick Fully
Push the dipstick back into its tube until it is completely seated.
This step is essential because only a fully inserted dipstick provides an accurate measurement.
Step 7: Remove It Again
Pull the dipstick out carefully.
Hold it horizontally to prevent the oil from running along the metal.
Now examine the oil level.
Understanding the Dipstick Markings
Most vehicles use one of several marking styles.
| Dipstick Marking | What It Means | Recommended Action |
| Full/MAX | Oil is at the ideal level | No action needed |
| Between MIN and MAX | Safe operating range | Continue driving |
| Near MIN | Oil is getting low | Monitor or top off soon |
| Below MIN | The oil level is too low | Add oil immediately |
| Above MAX | Too much oil | Remove excess if necessary |
Aim to keep the oil level close to the FULL mark without exceeding it.
Overfilling can be just as harmful as running low on oil because excess oil may foam, reducing lubrication efficiency.
How to Tell If Your Oil Is Healthy
The dipstick reveals more than just oil level; it also provides clues about oil condition. Healthy oil is usually:
- Smooth
- Amber or light brown
- Transparent enough to see through a thin coating
- Free from debris
Oil that may need changing is often:
- Very dark or black
- Thick or sludgy
- Gritty
- Milky (which can indicate coolant contamination)
- Foamy (which may suggest overfilling or another issue)
While dark oil isn’t always a problem, modern oils naturally darken over time, combining color with your maintenance schedule and the manufacturer’s recommended oil change interval is the best way to judge when service is due.
Personal Experience
One habit I’ve developed over the years is checking the dipstick before any long drive. It takes less than two minutes, but it offers valuable peace of mind. More than once, I’ve found the oil level just below the full mark after several months of daily driving.
A small top-up restored it to the proper level, and I could set off knowing the engine had the lubrication it needed. I also appreciate how the dipstick lets me monitor oil condition between scheduled services.
While I still follow the recommended oil change intervals, a quick visual check helps confirm everything looks normal and alerts me if something unusual appears.
Understanding Engine Oil Color
One of the biggest misconceptions among drivers is that dark oil automatically means it’s time for an oil change. While color can provide useful clues, it shouldn’t be the only factor you consider.
Here’s a quick guide to what different oil colors may indicate.
| Oil Color | What It Usually Means | Recommended Action |
| Light Amber | Fresh, clean oil | No action needed |
| Golden Brown | Normally used oil | Continue monitoring |
| Dark Brown | Oil has been in service for some time | Check maintenance schedule |
| Black | Common in high-mileage or diesel engines | Consider an oil change if due |
| Milky Brown | Possible coolant contamination | Have the engine inspected immediately |
| Foamy or Bubbly | Oil may be overfilled or contaminated | Investigate before driving long distances |
Remember, modern synthetic oils often darken quickly because they are cleaning deposits inside the engine. Dark oil alone isn’t always a sign of poor oil quality.
What Happens If Your Oil Level Is Too Low?
Engine oil creates a protective film between moving metal parts. When the oil level drops too low, those parts begin rubbing together with less lubrication.
Low oil can cause:
- Increased engine wear
- Higher engine temperatures
- Reduced fuel economy
- Noisy engine operation
- Accelerated component failure
- Complete engine seizure in severe cases
Ignoring a low oil level for an extended period can result in repairs costing thousands of dollars. That’s why checking your dipstick regularly is one of the easiest forms of preventive maintenance.
What Happens If You Overfill the Engine Oil?
Many people assume adding a little extra oil provides additional protection. Unfortunately, that’s not true.
Too much oil can create problems such as:
- Foaming oil
- Reduced lubrication
- Increased crankshaft resistance
- Oil leaks
- Damaged seals
- Excessive oil pressure
If the dipstick shows oil above the maximum mark, it’s generally best to remove the excess rather than continue driving, especially if it’s significantly overfilled.
Common Mistakes When Reading a Dipstick
Even though checking engine oil is simple, several common mistakes can lead to inaccurate readings.
1. Checking Immediately After Turning Off the Engine
Oil needs time to drain back into the oil pan. If you check too soon, the dipstick may show an artificially low reading.
Always wait at least five to ten minutes.
2. Forgetting to Wipe the Dipstick
The first pull is usually coated with oil splashed inside the dipstick tube.
Always wipe the dipstick clean before taking the actual measurement.
3. Parking on a Slope
Even a slight incline can shift the oil inside the pan.
Always check on level ground whenever possible.
4. Using the Wrong Oil
If your engine needs topping off, make sure you’re using the correct oil viscosity recommended by the manufacturer.
Using the wrong oil may reduce engine performance and protection.
5. Ignoring the Owner’s Manual
Different manufacturers use different dipstick designs. Some vehicles have:
- Crosshatched areas
- Two holes
- Two lines
- Letter markings
- Plastic measuring ends
Your owner’s manual explains exactly how your vehicle’s dipstick should be interpreted.
Why Engines Naturally Consume Oil
Many drivers become concerned after noticing their oil level slowly dropping between oil changes.
In reality, some oil consumption is perfectly normal. Oil can be consumed through:
- Normal combustion
- High engine temperatures
- Turbocharger operation
- Valve guides
- Piston rings
Older engines generally consume more oil than newer ones. If you’re adding a small amount every few thousand miles, that may be completely normal.
However, if you’re adding oil every few hundred miles, it’s worth having the engine inspected.
Signs Your Engine May Have an Oil Leak
A dropping dipstick reading isn’t always caused by oil consumption. Your vehicle may have an external leak. Watch for:
- Oil spots under the car
- Burning oil smell
- Blue exhaust smoke
- Low oil warning light
- Dirty engine components
- Oil around the oil filter
- Wet valve cover gasket
Early leak detection can prevent expensive repairs later.
Different Types of Oil Dipsticks
Although they all perform the same function, dipsticks vary between manufacturers.
Traditional Steel Dipstick
The most common design.
Features:
- Metal blade
- Easy to clean
- Clearly marked measurement area
Advantages:
- Very accurate
- Durable
- Easy to read
Plastic Measuring Tip
Some newer vehicles use plastic measuring ends.
Benefits include:
- Corrosion resistance
- Lightweight design
- High visibility
However, plastic tips may become brittle with age if exposed to excessive engine heat.
Electronic Oil Monitoring Systems
Some modern vehicles no longer include a traditional dipstick.
Instead, oil level is measured electronically through the vehicle’s onboard computer.
While convenient, many experienced technicians still appreciate having a physical dipstick for visual confirmation of oil condition.
How Often Should You Check the Dipstick?
Checking frequency depends on your driving habits.
A good rule of thumb is:
| Driving Style | Recommended Check Interval |
| Daily commuting | Once per month |
| High-mileage driving | Every two weeks |
| Before long road trips | Always |
| Older vehicles | Weekly |
| High-performance cars | Every fuel fill or two |
Frequent checks help identify developing problems before warning lights appear.
Tips for Getting the Most Accurate Reading
For consistent results:
- Park on level ground.
- Let the engine cool for several minutes.
- Use a clean, lint-free cloth.
- Fully insert the dipstick before reading.
- Read the oil immediately after removing the dipstick.
- Avoid windy or dusty environments that could contaminate the oil.
These simple habits improve measurement accuracy.
When Should You Add Engine Oil?
If the oil level falls below the minimum mark, it’s time to add oil. Add small amounts gradually. A good approach is:
- Add a small quantity.
- Wait a minute.
- Recheck the dipstick.
- Repeat if necessary.
Avoid pouring in a full quart or liter all at once unless you know exactly how much is needed. Slow, careful adjustments help prevent overfilling.
Personal Review
One lesson I’ve learned is that consistency matters more than complexity. Checking the dipstick isn’t difficult; it simply requires making it a habit. I usually inspect the oil once a month and before any extended highway trip.
Over time, this routine has helped me become familiar with what’s normal for my vehicle, making it much easier to spot changes before they turn into problems.
I’ve also found that keeping a clean microfiber cloth in the trunk makes the process quicker and less messy than searching for paper towels every time I want to check the oil.
Buyer’s Guide: What You’ll Need to Check and Maintain Your Engine Oil
Reading your dipstick is only part of proper engine maintenance. Having a few basic tools and supplies on hand makes checking and topping up your oil quick, clean, and stress-free.
Essential Items
| Item | Why You Need It | Recommended For |
| Clean microfiber cloth | Wiping the dipstick clean | Every vehicle owner |
| Disposable nitrile gloves | Keeps hands clean | DIY maintenance |
| Correct engine oil | Topping off the low oil | All vehicles |
| Funnel | Prevents spills | Beginners |
| Flashlight | Improves visibility under the hood | Nighttime inspections |
| Owner’s manual | Confirms oil specifications | Every vehicle |
A small maintenance kit stored in your trunk or garage can save time and help you respond quickly if your oil level is low.
Choosing the Right Engine Oil
Using the correct oil is just as important as maintaining the correct oil level. When selecting engine oil, pay attention to:
- Viscosity rating (such as 0W-20, 5W-30, or 10W-40)
- Manufacturer approvals
- API or ACEA specifications
- Whether your engine requires synthetic, synthetic blend, or conventional oil
Always follow the specifications listed in your owner’s manual. Using the wrong viscosity can affect lubrication, fuel economy, and engine performance.
Conventional vs. Synthetic Oil
Choosing between conventional and synthetic oil depends on your vehicle, driving habits, and budget.
| Feature | Conventional Oil | Full Synthetic Oil |
| Price | Lower | Higher |
| Engine Protection | Good | Excellent |
| Cold Weather Performance | Fair | Excellent |
| High Temperature Stability | Good | Excellent |
| Oil Change Interval | Shorter | Longer |
| Engine Cleanliness | Moderate | Excellent |
| Best For | Older engines, light use | Modern engines, severe driving |
Synthetic oil generally offers better protection in extreme temperatures and under demanding driving conditions, but it’s important to use the type recommended for your vehicle.
Creating a Monthly Oil Check Routine
Checking your dipstick doesn’t have to be a chore. Build it into your regular maintenance schedule.
A simple routine might look like this:
Week 1
- Check the oil level.
- Inspect the oil color.
Week 2
- Look for any oil spots under the vehicle.
Week 3
- Listen for unusual engine noises.
Week 4
- Recheck the dipstick before a weekend drive.
This takes only a few minutes each month but can help identify problems early.
Seasonal Tips for Reading Your Dipstick
Summer
High temperatures can increase engine stress. Check the oil level more frequently if you drive long distances or tow heavy loads.
Winter
Cold weather makes oil thicker during startup. Allow the engine to settle before checking the dipstick, and make sure you’re using the recommended winter-grade oil if applicable.
Rainy Season
Moisture and humidity generally don’t affect dipstick readings directly, but frequent short trips can lead to condensation inside the engine. Regular oil changes become even more important.
Expert Maintenance Tips
Here are some practical habits that can extend engine life:
- Check the oil at least once a month.
- Always use the recommended oil specification.
- Replace the oil filter with every oil change.
- Don’t ignore small oil leaks.
- Keep records of oil changes and top-ups.
- Investigate sudden drops in oil level.
- Never overfill the engine.
Preventive maintenance is almost always less expensive than repairing engine damage.
Signs It’s Time for an Oil Change
Even if the oil level is correct, the oil itself eventually wears out.
Common signs include:
- The oil change interval has been reached.
- The oil appears excessively dirty or sludgy.
- The engine runs louder than usual.
- Fuel economy decreases.
- The oil change reminder appears on the dashboard.
- You notice a burnt oil smell.
Regular oil changes help maintain engine performance and longevity.
Read More: Car AC Pressure Switch Bypass
FAQs: How To Read The Dipstick
1. How often should I read my dipstick?
A good rule is to check it once a month and before any long trip.
2. Should I check the oil when the engine is hot or cold?
Most vehicles should be checked after the engine has been turned off and allowed to sit for 5–10 minutes. Always follow your owner’s manual if it specifies a different procedure.
3. Can I drive with oil below the minimum mark?
It’s best to add oil before driving any significant distance. Running with low oil can increase engine wear.
4. Why does the oil level change after driving?
Oil circulates throughout the engine while it’s running. After the shutdown, it takes several minutes for the oil to drain back into the oil pan.
5. Is black oil always bad?
No. Engine oil naturally darkens over time as it collects contaminants. Follow the recommended oil change interval rather than judging by color alone.
6. What if the dipstick is dry?
A dry dipstick may indicate the oil level is dangerously low. Add the correct oil before driving and inspect for leaks or excessive oil consumption.
7. Can too much oil damage an engine?
Yes. Overfilling can cause foaming, increased pressure, and potential seal damage.
8. How long should I wait after turning off the engine before checking the oil?
For most vehicles, waiting 5 to 10 minutes allows the oil to drain back into the oil pan, providing a more accurate reading. Always refer to your owner’s manual if it specifies a different procedure.
9. Can I check the oil without wiping the dipstick first?
No. The first time you pull out the dipstick, oil may be smeared along the blade from inside the tube. Wipe it clean, reinsert it fully, and pull it out again for the correct reading.
10. Why does my oil level seem different every time I check it?
Several factors can affect the reading, including:
- Parking on uneven ground
- Checking the oil before it has settled
- Not fully inserting the dipstick
- Engine temperature differences
Using the same procedure each time helps ensure consistent results.
11. Should the oil level always be at the “Full” mark?
Ideally, yes. Keeping the oil near the Full mark provides the best protection. However, any level between the Minimum and Maximum marks is generally considered safe.
12. What if the oil smells burnt?
Burnt-smelling oil may indicate overheating, an overdue oil change, or excessive engine stress. If the smell persists, inspect the vehicle or have it checked by a qualified technician.
13. Is it normal to add oil between oil changes?
Yes. Many engines naturally consume a small amount of oil over time. Older, high-mileage, or turbocharged engines may require occasional top-ups between scheduled oil changes.
14. Can I mix different engine oil brands?
In most cases, mixing oils of the same viscosity and specification is acceptable in an emergency. However, for the best performance, it’s recommended to use the same brand and type whenever possible.
15. What if I accidentally overfill the engine?
If the oil level is significantly above the Maximum mark, remove the excess before driving. Overfilled engines can experience foaming, increased pressure, and seal damage.
16. Does every vehicle have a dipstick?
No. Some newer vehicles use electronic oil level monitoring systems instead of a traditional dipstick. Check your owner’s manual to see how your vehicle measures engine oil.
17. How often should I change my engine oil?
This depends on your vehicle, the type of oil used, and your driving conditions. Many modern vehicles can go 5,000 to 10,000 miles (8,000–16,000 km) or more between oil changes when using synthetic oil, but always follow the manufacturer’s maintenance schedule.
18. What should I do if the oil level keeps dropping?
Frequent oil loss may indicate:
- An external oil leak
- Worn piston rings
- Valve seal wear
- Increased oil consumption
If you’re adding oil frequently, have the vehicle inspected to identify the underlying cause.
Key Takeaways
Here’s a quick recap of the most important points:
- Check your engine oil at least once a month.
- Always park on level ground before checking the dipstick.
- Wait 5–10 minutes after turning off the engine.
- Wipe the dipstick clean before taking the final reading.
- Keep the oil level between the Minimum and Maximum marks.
- Use only the manufacturer-recommended oil specification.
- Never ignore a consistently low oil level.
- Avoid overfilling the engine.
- Monitor both the oil level and its condition.
- Follow the recommended oil change intervals.
Monthly Engine Oil Maintenance Checklist
Use this simple checklist to keep your engine in excellent condition:
| Task | Frequency | Completed |
| Check oil level | Monthly | ☐ |
| Inspect oil color | Monthly | ☐ |
| Look for leaks under the vehicle. | Monthly | ☐ |
| Check around the oil filter and drain plug | Every oil change | ☐ |
| Top off oil if needed. | As required | ☐ |
| Replace oil and filter. | According to the manufacturer’s schedule | ☐ |
| Record maintenance dates | Every service | ☐ |
Keeping a maintenance log can help you track oil consumption and identify changes over time.
Final Verdict
Learning how to read the dipstick is one of the simplest yet most valuable maintenance skills any driver can develop. It takes only a few minutes, requires no specialized tools, and can provide early warning signs of issues such as low oil levels, leaks, or oil contamination.
From my experience, making dipstick checks part of a routine provides confidence every time you get behind the wheel. It’s a small habit that can help prevent major engine problems and reduce long-term maintenance costs.
Whether you’re a new driver or an experienced vehicle owner, understanding your dipstick is an easy way to take better care of your car and extend the life of its engine.
Conclusion
Your engine depends on clean, properly maintained oil to perform at its best. The dipstick is a simple tool that gives you valuable insight into both the oil level and its condition.
By checking the dipstick regularly, following the correct procedure, and using the right engine oil, you can help reduce engine wear, improve reliability, and avoid costly repairs. Combined with routine oil changes and basic preventive maintenance, this quick inspection is one of the easiest ways to protect your investment.
The next time you open your hood, don’t overlook that small metal rod. A quick dipstick check today could save you from a much bigger repair tomorrow.


