A damaged car window seal might seem like a minor issue, but it can quickly become a major annoyance. From water leaks and wind noise to interior damage and reduced driving comfort, worn-out window seals can negatively impact your vehicle in several ways.
I learned this firsthand when I noticed a persistent whistling sound while driving on the highway. At first, I assumed it was normal road noise. However, after a heavy rainstorm left moisture inside the cabin, I realized the window seal had deteriorated and needed replacement.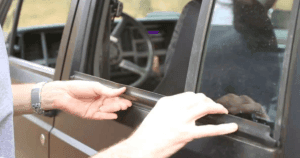 The good news is that replacing a car window seal is often a straightforward DIY project. With basic tools, patience, and the right replacement seal, many vehicle owners can complete the job in a few hours and save significant labor costs.
This comprehensive guide covers everything you need to know about replacing a car window seal, including tools, costs, step-by-step instructions, buying advice, common mistakes, and frequently asked questions.
Why Car Window Seals Matter
Window seals serve several important functions:
- Prevent water intrusion
- Reduce wind noise
- Block dust and debris
- Improve cabin insulation
- Protect interior components
- Maintain vehicle appearance
- Support proper window operation
When seals become cracked, brittle, or detached, these benefits disappear.
Signs Your Car Window Seal Needs Replacement
Watch for these common warning signs:
Water Leaks
Rainwater entering the cabin is the most obvious symptom.
Excessive Wind Noise
Whistling sounds at highway speeds often indicate gaps in the seal.
Visible Cracks
Rubber naturally deteriorates from UV exposure and aging.
Loose Seal Material
The seal may pull away from the frame.
Window Rattling
Poor sealing can allow excessive movement.
Moldy Odors
Water intrusion often leads to mildew growth.
Common Types of Car Window Seals
| Seal Type | Location | Purpose | Replacement Difficulty |
| Outer Belt Seal | Outside window edge | Keeps water away | Easy |
| Inner Belt Seal | Inside the door panel | Prevents moisture intrusion | Moderate |
| Weatherstrip Seal | Around the window frame | Wind and water protection | Easy |
| Quarter Window Seal | Fixed rear windows | Leak prevention | Moderate |
| Windshield Molding Seal | Around windshield | Structural protection | Difficult |
| Door Glass Run Channel | Window track | Guides window movement | Moderate |
Tools Needed for Window Seal Replacement
Most DIY replacements require:
- Plastic trim removal tools
- Flathead screwdriver
- Phillips screwdriver
- Needle-nose pliers
- Utility knife
- Cleaning cloths
- Adhesive remover
- Rubber-safe cleaner
- Silicone lubricant
- Replacement seal
Having quality trim tools prevents scratching painted surfaces.
Understanding Window Seal Materials
Modern seals are typically made from:
EPDM Rubber
Most common choice. Benefits include:
- UV resistance
- Weather resistance
- Long lifespan
- Flexibility
Silicone Rubber
Premium option offering:
- Extreme temperature resistance
- Superior flexibility
- Long durability
Thermoplastic Elastomer (TPE)
Often found on newer vehicles. Advantages include:
- Lightweight construction
- Excellent weather resistance
- Easy manufacturing
DIY vs Professional Replacement
| Factor | DIY Replacement | Professional Replacement |
| Cost | $20–$100 | $100–$500+ |
| Time | 1–4 hours | 1–2 hours |
| Skill Required | Moderate | None |
| Tool Investment | Minimal | Included |
| Risk of Mistakes | Medium | Low |
| Warranty | Parts Only | Parts and Labor |
| Best For | Simple seals | Complex installations |
Step-by-Step Guide: How To Replace a Car Window Seal
Step 1: Purchase the Correct Seal
Always verify:
- Vehicle make
- Model
- Year
- Door location
- Window type
OEM seals generally offer the best fit.
Step 2: Inspect Existing Seal
Before removal:
- Locate attachment points
- Identify clips
- Check for adhesive
- Note installation orientation
Taking photos helps during reassembly.
Step 3: Remove Door Panel (If Required)
Some seals require access behind the door panel. Typical process:
- Remove screws.
- Remove trim pieces.
- Disconnect electrical connectors.
- Lift the panel carefully.
Keep fasteners organized.
Step 4: Remove the Old Seal
Carefully pull the seal away. Use:
- Trim tools
- Plastic scrapers
- Gentle force
Avoid damaging painted surfaces.
Step 5: Clean the Surface
This step is critical. Remove:
- Dirt
- Old adhesive
- Rust
- Debris
Use a rubber-safe cleaner for best results.
Step 6: Compare Old and New Seals
Check:
- Length
- Shape
- Mounting points
- Clip locations
Small differences can create installation problems.
Step 7: Install the New Seal
Begin at one corner and work gradually. Important tips:
- Avoid stretching the seal.
- Press evenly.
- Ensure clips engage fully.
- Follow factory contours.
Patience is key.
Step 8: Apply Adhesive (If Required)
Some seals use weatherstrip adhesive. Apply:
- Thin bead
- Even coverage
- Manufacturer-recommended amount
Too much adhesive creates a mess.
Step 9: Reassemble Components
Reinstall:
- Door panel
- Clips
- Screws
- Electrical connections
Double-check everything before finishing.
Step 10: Test the Installation
Perform several checks:
- Open and close the window
- Check for gaps
- Spray water around the seal
- Listen for wind noise while driving
A successful installation should eliminate leaks and noise.
My Personal Experience Replacing a Window Seal
The first time I replaced a window seal, I underestimated how much cleaning mattered. I rushed the preparation and installed the new seal over leftover adhesive residue. The result?
The seal looked fine initially but developed small gaps within weeks. On the second attempt, I thoroughly cleaned the mounting surface and took my time aligning every section. The difference was dramatic.
Wind noise disappeared, water leaks stopped, and the window operated more smoothly. The lesson was simple: preparation determines success.
Common Mistakes to Avoid
Buying the Wrong Seal
Always verify compatibility.
Stretching the Rubber
Stretching causes shrinkage later.
Ignoring Surface Preparation
Poor cleaning reduces seal effectiveness.
Damaging Clips
Broken clips often create loose sections.
Using Excessive Adhesive
More adhesive does not mean better sealing.
Skipping Leak Testing
Always test before considering the job complete.
How Long Does Window Seal Replacement Take?
Approximate times:
| Vehicle Type | Time Required |
| Sedan | 1–2 Hours |
| SUV | 2–3 Hours |
| Truck | 2–3 Hours |
| Luxury Vehicle | 3–4 Hours |
| Classic Vehicle | 3–5 Hours |
Experience level significantly affects completion time.
Cost of Replacing Car Window Seals
DIY Costs
| Item | Average Cost |
| Replacement Seal | $20–$150 |
| Adhesive | $5–$20 |
| Trim Tools | $10–$30 |
| Cleaner | $5–$15 |
| Total DIY Cost | $40–$215 |
Professional Costs
Labor generally ranges from:
- $80–$300
- More for luxury vehicles
- More for fixed-glass windows
Benefits of Replacing a Damaged Window Seal
A new seal offers:
Improved Comfort
Reduced drafts and noise.
Better Weather Protection
Keeps rainwater outside.
Cleaner Interior
Blocks dust and debris.
Improved Appearance
Fresh rubber enhances vehicle aesthetics.
Prevents Costly Repairs
Protects electronics and upholstery from moisture.
How to Extend the Life of New Window Seals
Regular maintenance helps seals last longer.
Clean Monthly
Remove dirt buildup.
Apply Rubber Conditioner
Prevents drying and cracking.
Park in Shade
Reduces UV exposure.
Avoid Harsh Chemicals
Use rubber-safe products only.
Inspect Annually
Catch wear before major damage occurs.
Buyer’s Guide: Choosing the Best Replacement Car Window Seal
Selecting the right seal is essential for long-term success.
OEM vs Aftermarket
OEM Seals
Pros:
- Perfect fit
- Factory quality
- Reliable performance
Cons:
- Higher price
Aftermarket Seals
Pros:
- Lower cost
- Wide availability
Cons:
- Fit may vary
For daily drivers, quality aftermarket options often work well. For luxury or classic vehicles, OEM parts are usually worth the investment.
Material Quality
Choose seals made from:
- EPDM rubber
- Silicone rubber
- Premium weather-resistant compounds
Avoid low-cost generic rubber products.
Warranty Coverage
Look for:
- Manufacturer warranty
- Defect protection
- Fitment guarantee
A warranty indicates confidence in product quality.
Customer Reviews
Review feedback regarding:
- Fitment accuracy
- Durability
- Ease of installation
- Water resistance
Real-world experiences reveal long-term performance.
Complete Kits vs Individual Pieces
Complete kits often provide:
- Better value
- Matching components
- Easier installation
Individual seals are ideal when only one section is damaged.
When You Should Hire a Professional
Consider professional help if:
- Windshield seal replacement is required
- Structural glass removal is necessary
- Rust repair is needed
- Electronic systems must be disconnected
- The vehicle is high-end or collectible
Some jobs simply justify expert installation.
Read More: Can a Fuel Pump Cause a Car Not To Start
FAQs: How To Replace Car Window Seal
How do I know if my car window seal is bad?
Common signs include water leaks, wind noise, visible cracks, loose rubber, rattling windows, and interior moisture.
Can I replace a car window by myself?
Yes. Many door and side-window seals can be replaced by DIY enthusiasts using basic hand tools.
How much does it cost to replace a car window seal?
DIY replacement typically costs $40–$215, while professional installation may range from $100–$500 or more.
How long do car window seals last?
Most quality window seals last between 8 and 15 years depending on climate, maintenance, and sun exposure.
Can a bad window seal cause mold?
Yes. Water intrusion can create damp conditions that encourage mold and mildew growth inside the vehicle.
Should I use adhesive when installing a new seal?
Only if specified by the manufacturer. Many modern seals use clips or pressure-fit designs.
What is the best material for a replacement window seal?
EPDM rubber is generally considered the best balance of durability, flexibility, UV resistance, and affordability.
Can window seals reduce road noise?
Yes. Properly installed seals significantly reduce wind and road noise entering the cabin.
Are OEM window seals worth the extra money?
In many cases, yes. OEM seals usually provide superior fit, longevity, and reliability.
How can I make my new window seals last longer?
Clean them regularly, apply rubber conditioner, avoid harsh chemicals, and park in shaded areas whenever possible.
Final Thoughts
Replacing a car window seal is one of the most rewarding maintenance projects a vehicle owner can tackle. The job is affordable, requires relatively simple tools, and can dramatically improve comfort, weather protection, and vehicle appearance.
Whether you’re fixing a small water leak, eliminating highway wind noise, or restoring an aging vehicle, taking the time to install a quality replacement seal properly can provide years of trouble-free service.
The key is patience. Carefully remove the old seal, thoroughly clean the mounting surface, and install the new seal without stretching or forcing it. Done correctly, your vehicle will feel quieter, cleaner, and better protected from the elements.


