Installing a rear-facing car seat correctly is one of the most important things parents can do to protect their child while traveling. Yet studies consistently show that many car seats are installed incorrectly, reducing their effectiveness during a collision.
When I installed my first rear-facing car seat, I assumed it would be a quick five-minute job. Instead, I spent nearly an hour adjusting straps, checking angles, and rereading the instruction manual. What seemed simple at first turned out to be more technical than expected.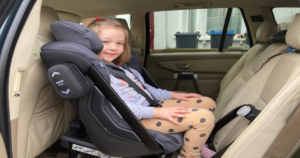 The good news is that once you understand the process, installing a rear-facing car seat becomes straightforward. Whether you’re a first-time parent or replacing an older seat, this guide will walk you through everything you need to know.
In this comprehensive article, you’ll learn:
- Why are rear-facing seats safer
- How to install using the LATCH system
- How to install using a seat belt
- Common installation mistakes
- Safety checks before every trip
- Tips from personal experience
- A detailed buyer’s guide
- Frequently asked questions
Why Rear-Facing Car Seats Matter
Rear-facing car seats are specifically designed to protect infants and toddlers.
During a frontal collision, the seat cradles the child’s head, neck, and spine while distributing crash forces across the seat’s entire back. This significantly reduces the risk of serious injury.
Safety experts recommend keeping children rear-facing as long as possible, usually until they reach the maximum height or weight limit specified by the car seat manufacturer.
Benefits of Rear-Facing Seats
✓ Better neck support
✓ Enhanced head protection
✓ Reduced spinal injuries
✓ Improved crash force distribution
✓ Recommended by pediatric safety experts
Rear-Facing Car Seat Installation Methods Comparison
| Feature | LATCH Installation | Seat Belt Installation |
| Ease of Use | Easier for beginners | Requires more practice |
| Installation Speed | Faster | Slightly slower |
| Compatibility | Depends on vehicle anchors | Works in virtually all vehicles |
| Security | Excellent when used properly | Equally secure when installed correctly |
| Learning Curve | Low | Moderate |
| Ideal For | New parents | Any vehicle setup |
| Common Mistakes | Anchor misuse | Belt routing errors |
| Long-Term Flexibility | Limited by weight limits | Greater flexibility |
Important: A correctly installed seat belt installation is just as safe as a correctly installed LATCH installation.
Understanding Rear-Facing Car Seat Components
Before installation, familiarize yourself with the main components.
Base
Many infant seats include a removable base that stays in the vehicle.
Carrier
The seat portion that carries the baby.
Harness System
Secures the child within the seat.
Recline Indicator
Ensures the seat sits at the correct angle.
LATCH Connectors
Attach directly to vehicle anchor points.
Belt Path
Guides the vehicle seat belt through the seat.
Step 1: Read Both Manuals
This may sound obvious, but it’s the most skipped step.
Always read:
- Vehicle owner’s manual
- Car seat instruction manual
Manufacturers often have unique installation requirements.
Step 2: Choose the Correct Seating Position
The safest location is generally:
Center Rear Seat
Advantages:
- Farthest from side impacts
- Often considered safest
However, not all vehicles support proper installation in the center.
Rear Passenger Side
Benefits:
- Easier loading from the curbside
- Commonly used by parents
Rear Driver Side
Benefits:
- Convenient access
- Works well in many vehicles
Never place a rear-facing car seat in front of an active airbag.
Step 3: Determine Installation Method
Choose one:
Method A: LATCH System
Method B: Vehicle Seat Belt
Do not use both unless specifically allowed by the manufacturer.
How to Install Using the LATCH System
The Lower Anchors and Tethers for Children (LATCH) system simplifies installation.
Step-by-Step Process
Step 1
Locate vehicle lower anchors.
These are usually found between the seat cushions.
Step 2
Attach both LATCH connectors.
Listen for an audible click.
Step 3
Apply pressure.
Push down firmly on the car seat using your body weight.
Step 4
Tighten straps.
Pull until the seat no longer shifts excessively.
Step 5
Check movement.
The seat should move less than one inch side-to-side or front-to-back.
Step 6
Verify recline angle.
Use the built-in indicator.
How to Install Using a Seat Belt
Many parents overlook this method, but it is equally safe.
Step-by-Step Process
Step 1
Locate the rear-facing belt path.
Step 2
Thread the seat belt correctly.
Follow the manufacturer’s instructions carefully.
Step 3
Buckle the belt.
Step 4
Engage the locking mechanism.
Modern vehicles typically use locking seat belts.
Step 5
Apply pressure.
Press down on the seat while tightening.
Step 6
Check for movement.
Less than one inch is acceptable.
Setting the Correct Recline Angle
One of the most important aspects of installation is proper recline.
Too Upright
May cause an infant’s head to fall forward.
Too Reclined
Can increase movement during a crash.
Most seats include:
- Bubble indicators
- Level lines
- Digital indicators
Always follow manufacturer guidelines.
Harnessing Your Child Properly
Even a perfectly installed seat cannot protect a child if the harness is incorrect.
Correct Harness Position
For rear-facing seats:
Harness straps should be at or below shoulder level.
Chest Clip Position
Place at armpit level.
Tightness Test
Try the pinch test.
If you can pinch harness webbing, it’s too loose.
Common Installation Mistakes
After reviewing hundreds of parent discussions and safety recommendations, several mistakes appear repeatedly.
1. Loose Installation
The most common issue.
Remember:
Less than one inch of movement.
2. Incorrect Recline
Always use the recline indicator.
3. Harness Too Loose
Perform the pinch test every trip.
4. Chest Clip Too Low
Keep it at armpit height.
5. Bulky Winter Clothing
Heavy coats create dangerous slack.
Use blankets over the harness instead.
6. Using Both Installation Methods
Unless specifically approved, choose either LATCH or seat belt.
7. Ignoring Weight Limits
LATCH systems often have maximum child weight limits.
My Personal Experience Installing Rear-Facing Car Seats
Over the years, I’ve helped family members install several rear-facing seats in different vehicles.
One thing became obvious very quickly: every vehicle is different.
A compact sedan offered limited space, requiring more seat adjustments. An SUV, on the other hand, provided abundant room but had deeper seat cushions that made tightening slightly more challenging.
The biggest lesson was patience.
Rushing the installation often resulted in mistakes that required starting over. Spending an extra ten minutes checking everything provided peace of mind every time we drove.
Rear-Facing Car Seat Safety Checklist
Before every trip, verify:
✓ Harness snug
✓ Chest clip at armpit level
✓ Seat moves less than one inch
✓ Correct recline angle
✓ No twisted straps
✓ Child within weight limits
✓ No bulky coats
✓ Buckle fully engaged
When Should You Switch to a Forward-Facing Seat?
Many parents switch too early. Remain rear-facing until:
- Maximum weight limit reached
- Maximum height limit reached
- Manufacturer recommends transition
Modern convertible seats often allow rear-facing up to 40–50 pounds.
Traveling With a Rear-Facing Car Seat
Road Trips
Check the installation before departure.
Rental Cars
Bring your own seat whenever possible.
Air Travel
Use FAA-approved seats.
Rideshare Vehicles
Plan extra time for installation.
Cleaning and Maintenance
A clean car seat lasts longer and performs better.
Weekly
- Remove crumbs
- Check the harness condition
Monthly
- Inspect connectors
- Verify tight installation
Every Six Months
- Review weight limits
- Check the expiration date
Signs Your Car Seat Needs Replacement
Replace immediately if:
- Involved in a significant crash
- Cracked shell
- Missing parts
- Damaged harness
- Expired seat
Never purchase a used seat with an unknown history.
Buyer’s Guide: Choosing the Best Rear-Facing Car Seat
If you’re shopping for a new seat, focus on safety and practicality.
1. Safety Ratings
Look for:
- Federal safety compliance
- Side-impact protection
- Crash-testing performance
2. Rear-Facing Weight Capacity
Higher limits allow longer rear-facing use. Recommended:
40–50 pounds or higher.
3. Ease of Installation
Features that help:
- Click-connect LATCH
- Clear indicators
- Lock-offs
4. Adjustable Recline
Multiple positions improve compatibility.
5. Easy-Clean Fabric
Removable machine-washable covers save time.
6. Vehicle Compatibility
Always verify compatibility before purchase.
7. Longevity
Convertible seats often provide greater long-term value.
Infant Seat vs Convertible Seat Comparison
| Feature | Infant Car Seat | Convertible Car Seat |
| Portable | Yes | No |
| Removable Carrier | Yes | No |
| Newborn Convenience | Excellent | Good |
| Long-Term Use | Limited | Excellent |
| Travel System Compatible | Usually | Rarely |
| Cost Over Time | Higher | Better value |
| Rear-Facing Duration | Shorter | Longer |
| Best For | Newborns | Growing families |
Expert Tips for Easier Installation
Use Your Body Weight
Kneel gently in the seat while tightening.
Practice Before Baby Arrives
Installation is easier without pressure.
Check Monthly
Seats can loosen over time.
Register Your Car Seat
This ensures recall notifications.
Seek Professional Inspection
Many communities offer certified car seat inspections.
Read More: Can a Fuel Pump Cause a Car Not To Start
FAQs: How To Install Rear Facing Car Seat
How tight should a rear-facing car seat be?
The seat should move less than one inch when tested at the belt path.
Can I install a rear-facing seat in the front seat?
Only if the vehicle manufacturer specifically permits it and the airbag is disabled. The rear seat is strongly preferred.
Is LATCH safer than a seat belt?
No. Both methods are equally safe when used correctly.
How long should my child remain rear-facing?
Until they reach the seat’s maximum rear-facing height or weight limit.
What is the safest position for a rear-facing car seat?
The center rear seat is often considered safest if proper installation is possible.
Can a newborn use a convertible car seat?
Yes, provided it fits newborn weight requirements and offers proper support.
How often should I check the installation?
Check before long trips and inspect monthly for loosening.
Are car seats allowed on airplanes?
Many are approved for aircraft use. Look for FAA approval labeling.
Should I buy a used car seat?
Only if you know its complete history and it has never been involved in a crash.
What happens if the seat is too reclined?
Excessive recline can increase movement during a collision and reduce protection.
How can I tell if my child has outgrown the seat?
Check height and weight limits listed by the manufacturer.
Do rear-facing seats expire?
Yes. Most expire between 6 and 10 years after manufacture.
Can winter coats be worn in a car seat?
Heavy coats are not recommended because they create dangerous slack in the harness.
What should I do after a car accident?
Follow manufacturer guidelines. Many seats require replacement after moderate or severe crashes.
Is professional installation necessary?
Not always, but having a certified technician inspect your installation can provide additional peace of mind.
Final Thoughts
Learning how to install a rear-facing car seat correctly is one of the most valuable parenting skills you can develop. While the process may seem intimidating at first, following the manufacturer’s instructions, checking for proper tightness, and maintaining the correct recline angle can dramatically improve your child’s safety.
A properly installed rear-facing seat offers exceptional protection during collisions and gives parents confidence every time they drive. Take your time, double-check your work, and remember that a few extra minutes spent ensuring a secure installation can make all the difference.


